Wednesday, April 27, 2011

Edited Car- Gimp Assignment 2

Gimp Assignment two- touchup.

Photo 1- Red car before touchup.
Photo 2- Red car after touchup.
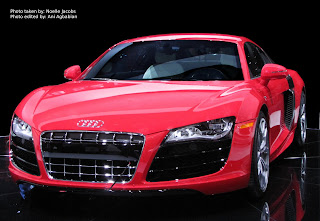


I learned how to use the Gimp editor to touch up my photos. I had no idea before this how you could erase people, make backgrounds different colors, and clone colors, but by using Gimp I learned how to do all of this. I also learned how to use some of the editing tools on Gimp.

Monday, April 25, 2011


Black and White- Best Photo.
fStop: f/10
ISO: 400
Shutter Speed: 1/200


Black And White.

Photo 1- Red rose
Photo 2- Three lights
Photo 3- Clouds, water, and tree
Photo 4- Broken lantern
Photo 5- Lantern on brick
Photo 6- Garden flower branch
Photo 7- Pink flower
Photo 8- Hose
Photo 9- Tree and bird feeder
Photo 10- Stapler
Photo 11- Window sill
Photo 12- Spoons and forks


I learned how to take really cool pictures in black and white. I now know how to adjust the aperture and shutter speed to make the effects on my black and white photo really cool. I also learned how to use Photoshop to make it black and white, and which shades would be most appealing for each photograph.

Wednesday, April 20, 2011

Gimp Pop Art


Gimp Pop Art Assignment

Photo 1- Pop art of me

I learned how to use gimp. I had no idea how to use any of this until now. I also learned how to make colorful pop art with gimp, as well as make it a different looking texture.

Tuesday, April 19, 2011

Why I chose black and white.

http://www.flickr.com/photos/dogwatcher/3598245867/


I chose black and white because I like how it sets in with a photo. I think this photograph of the flamingo really portrays how black and white should be used. It shows how dramatic the photo is, where as if it was in color, it would not be as dramatic. It is not blurry and the composition is set just right, so it makes for a really good black and white photo.

Friday, April 15, 2011

Motion and Aperture


Motion and Aperture

Photo 1- Faucet water
Photo 2- Faucet water
Photo 3- Faucet water
Photo 4- Faucet water
Photo 5- Dog toy
Photo 6- Dog toy
Photo 7- Dog toy
Photo 8- Dog toy


From this assignment I learned how to take aperture shots that either focus on one object and have the background blurry, or that have everything in focus. I also learned how to take motion shots on my camera by changing the shutter speed, that either are still or show movement by being blurry. I learned how to use the AV and TV mode on my camera and which settings to go to.

Friday, April 1, 2011

Composition


  • The rules of composition.

  • Photo 1- Lines: brick railing
  • Photo 2- Depth: berry's
  • Photo 3- Symmetry: stairs
  • Photo 4- Texture: bark
  • Photo 5- Rule of thirds: tree
  • Photo 6- Pattern: bottles
  • Photo 7- Color: door knob
  • Photo 8- Frame: gutter
  • Photo 9- Space: plant
  • Photo 10- Balance: airplane
  • Photo 11- Perspective: wine glass

  • I learned all the rules of composition. Before this class I had no idea what composition even meant or how to use the rules of it, but now I do. I learned the rule of thirds, how to use perspective, and how to create balance in a graceful way.